Showing posts with label black. Show all posts

Tuesday, October 18, 2016

Ever After Polish The Wicked Collection (Part One): Swatches and Review

Ever After Polish The Wicked Collection (Part One): Swatches and Review

*Purchased by Me*

Hello, there! Today, I am sharing part of one of Ever After's newest collections with you: The Wicked Collection! Yep, that's right; this collection is based off of the play Wicked! Now, I've never seen it, but it is most definitely on my bucket list! 

The Wicked Collection is made up of 6 polishes, and I will be showing you three today, and three later on. To avoid being repetitive, each of these three polishes was smooth and easy to apply, had a quick dry time, and dried glossy. Each color is shown with two coats for full opacity, plus one layer of glossy top coat. Let's get to it! 

Ever After Polish Fly My Pretties, Fly

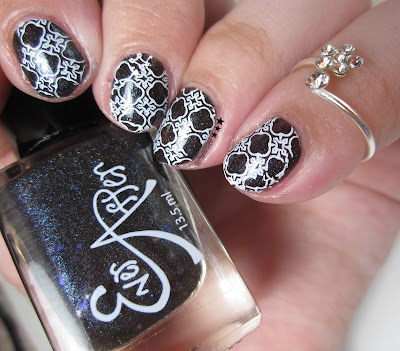
The first color that I'm showing you is Fly My Pretties, Fly. This is described on the Ever After site as a deep chocolate leaning plum with blue to purple crystal flakes with blue to purple shimmers. It is available here, and the cost is $10.50 for a full-sized 13.5 mL bottle.


I also added some stamping on top of Fly My Pretties, Fly!  This image is from a plate by UR Beautiful, and I used white Konad polish to stamp. 


Ever After Polish Defying Gravity

Next up is Defying Gravity! Defying Gravity is described on Ever After's site as a black jelly with green and purple shimmers and flecks with scattered holo sparkle. It is available right here, and the cost is $10.00 for a full-sized 13.5 mL bottle. 


I chose another image from UR Beautiful to stamp on top of Defying Gravity, and again used white Konad polish. 


Ever After Polish The Emerald City

The third color that I have to share with you today is The Emerald City. The Emerald City is described as a deep emerald green with silver shimmer. This may just be my favorite out of the three colors that I'm showing you today! You can find The Emerald City right here, and the cost is $10.50 for a full-sized 13.5 mL bottle. 


I again chose an image from UR Beautiful, and stamped with white Konad polish. I think that this is also my favorite image out of the three! 


So, what's your favorite out of these three polishes? As I said above, my top one is going to have to be The Emerald City. I'll be back soon with the other half of The Wicked Collection! 

Please be sure to check out Ever After on social media! 
Shop        Instagram          Facebook          Facebook Fan Group

Thank you so much for stopping by, and I'll see you next time! 
♥ Megan

Saturday, September 3, 2016

Daily Hues Nail Lacquer Holo-Maniacs Custom #7: Swatch and Review

Daily Hues Nail Lacquer Holo-Maniacs Custom #7: Swatch and Review

*Sent by maker for swatch and review*

Hello! Today, I'm back with another group custom for my Facebook group Holo-Maniacs, where we share our love for everything holographic! September's custom was created by Jenn Skinner of Daily Hues Nail Lacquer (DHNL), and it is currently available! 

As usual, I posted a color poll in the group, followed by a picture inspiration thread and voting on said submitted pictures. Here is the winning picture, as well as the final polish that Jenn created! 


This was my first polish from DHNL, and the formula was great! Holo-Maniacs Custom #7 is described as nude/sand-colored linear holo with gold highlights. It is exactly that! At first glance, it may look like a simply nude polish, but when you look closer, the gold highlights really pop!  I was almost able to get it opaque in one coat, but did two to cover some bare spots. It dries smooth and glossy. The formula was a bit thick, but was easily controllable and not at all difficult to work with. Shown are to coats plus glossy top coat. 

I also decided to add some stamping to DHNL Holo-Maniacs Custom #7. Once dry, I chose a thunder bolt image from a plate that I purchased off of ebay. I stamped this image in black (Konad black), as I love a black and neutral combo! For this, I used my semi-squishy stamper from Bundle Monster. Everything is sealed in with a thick layer of glossy top coat! 


Daily Hues Nail Lacquer Holo-Maniacs Custom #7 is currently available for the month of September. You do have to be a part of the Holo-Maniacs group, so be sure to come over, if you are interested! 

Please be sure to check out DHNL on social media! 

Shop       Instagram       Facebook       Facebook Fan Group

Thank you so much for stopping by, and I'll see you next time! 
♥ Megan

*This polish was sent to me by the maker; all opinions are my own!*

Friday, August 19, 2016

Animal Print Nails! Featuring Carpe Noctem Cosmetics

Animal Print Nails! Featuring Carpe Noctem Cosmetics

*Purchased by Me*

Happy Friday! Tonight, I'm going to be showing you a mani that I did with a color from Carpe Noctem Cosmetics that I've had in my to-try pile for a bit. 

One of the colors that I've picked up recently from Carpe Noctem is another color from Emily's Inspiration Collection, in which each polish was inspired by a person in the nail polish community who is very important to her. This polish is named Classy As Fuck, and it was inspired by An of The Polished Hippy. Now, I have had the pleasure of interacting with An as well, and I can attest to her classiness and kindness; I 100% respect and value her as a fellow member of the nail community, and always look to her for advice! Please, please, please be sure to go check out her blog! 

Classy As Fuck is described on Emily's site as a metallic red linear holo with platinum and multichrome flakies. I was able to get it fully opaque in two easy coats, which applied smoothly and dried quickly and shiny! 


For my mani, I applied Classy As Fuck on my thumbs, ring fingers, and pinkies. Then, I applied two coats of Sally Hansen's Tag, Ur It! on my index and middle fingers. Once that was dry, I stamped a zebra print image (in black) on top of the white base; for this, I used a plate that I had picked up in an "As Seen on TV" kit, long, long ago (it was actually the beginning of my ventures into stamping!). Once everything dried, I sealed it all in with another layer of topcoat. Here is the final result! 


If you are interested in picking up a bottle of Classy As Fuck, you can find the listing for it on Emily's site, right here! The cost is $12.00 for a 15 mL full size bottle, or $6.00 for a 6 mL mini bottle.

 
Please be sure to check out Carpe Noctem Cosmetics on social media! 

Shop       Instagram       Facebook       Facebook Fan Group

Thank you so much for stopping by, and I'll see you next time! 
♥ Megan

Monday, April 11, 2016

Mani Monday: Ever After Polish Atlantis and Water Decals from Born Pretty Store

*Gifted to Me*
*Purchased by Me*


Happy Mani Monday! Today I want to share with you a mani that I did last night, using a polish from Ever After, and some full-nail water decals from Born Pretty Store. 

To start out with this mani, I painted my pinky, index finger, and thumb with Ever After Atlantis. Atilantis was a part of the Fall 2015 Feminine Chic collection, and it is described as "a scattered holo with gold and violet flakes in a blue base, packed with shimmer." The formula on Atlantis was nice and smooth, and it dried quickly. I used two coats, plus top coat, for my mani. 


Next, I painted my ring and middle finger white, using two coats of OPI Alpine Snow. I applied white because the background of the water decals that I selected is clear; therefore, I need a base for the design and colors to stand out! After the two coats of Alpine Snow were dry,  cut and applied my water decals. Here is the final result! 


I am falling more and more in love with water decals! They are a quick and simple way to add some flair to a manicure. If you are interested in picking up this design, you can find them on Born Pretty Store's website right here

Ever After Atlantis is no longer available in the shop, but you may be able to find it through blog sales or destashes. 

Be sure to check out Ever After on social media! 
Ever After Polished Princesses (Facebook fan group): https://www.facebook.com/groups/790115414369756/
 
Thanks for stopping by, and I'll see you next time! 
♥ Megan

Wednesday, April 6, 2016

Pretty Jelly Diamond S-teal-er: Swatch and Review

*Purchased by Me*

Hey, hey, hey! I have another polish from Pretty Jelly to share with you today! I told you that I'm falling in love with this brand, right?? The color that I have for you today is named Diamond S-teal-er (yeah, that's my own label lol; I bought the mini from a destash!)


 Diamond S-teal-er definitely leans more on the blue side of teal than the green side; in fact, there isn't really any green in there. But, it is still stunning!! There is a linear holo hidden in this baby, but it is more visible in brighter lights, at an angle. Regardless, it is a wonderful shade of blue. The formula was smooth and even, and I was able to achieve full opacity in three thin coats. Shown are those three coats, plus glossy top coat!


The day after I applied this, I received an order in the mail from Born Pretty Store. I had ordered some full nail water decals to try, and one of the prints that I ordered complimented Diamond S-teal-er! I decided to use this print for two accent nails for my mani. 

Once I figured out how to use the water decals, they were simple to apply. In order to use these, you need to peel off the thin plastic layer covering the decal sheet, cut  piece big enough for your nail, and submerge the decal in water for 10-20 seconds. After removing the decal from the water, you slide the image from the backing and place it on your nail; then, you push it down in place and soak up the extra water with a paper towel. Top the decal with topcoat and clean up any extra that may be hanging over your nail and/or cuticle, and you are good to go! At first, I didn't realize that there was a thin sheet of plastic covering the decals; by the time I messed up 1/3 of the sheet, I realized it and fixed my mistake. Now I love them, and I already have more on their way to me! They seem like a  simple and quick way to create a pretty mani. 


If you like these water decals and want to give them a try, you can find them on Born Pretty Store's website right here! They have lots of other images available as well, so you can pick and choose what you are interested in. 

Have you used water decals? How do you like them? Let me know below! 

Be sure to check out Pretty Jelly on social media! 

We Jelly All the Pretty Jelly (Facebook fan group): https://www.facebook.com/groups/WeJellyAllthePrettyJellyPolish/
 
Thanks for stopping by, and I'll see you next time! 
♥ Megan

Saturday, March 19, 2016

Leopard Skittlette using Ever After Customs, OPI, and Zoya

*Purchased by Me*
*Borrowed from Someone Else*

Happy Saturday, and I hope you're having a great one so far! I feel like time is going by so fast, and can't believe that March is almost over!

For you today, I have some skittlette nail art! For this design, I used my basic black, Zoya Willa, and basic white, OPI Alpine Snow. For my holos/indies, I used two customs that were created by Rachel of Ever After. Let's take a look! 

The fist Ever After custom is one that I purchased from someone who was destashing. It is a red holo, and it comes from a collection that was based off of characters from Pretty Little Liars. This color is named -A, and it is based off of, well...A! It is opaque in two coats.


The next custom is one that my mother had made, named Luna's Stardust. This is a black linear holo with silver flakies! It is opaque in two coats. 


 To make the leopard print design for my mani, I used a cuticle stick that I had on hand, which has one pointed end and one flat end. I used the flat end to make red spots using -A, over Alpine Snow, and the pointed end to make small lines and dots, using Willa. Everything is sealed in with top coat. Here's the final look! 


Leopard print was one of the first types of nail art that I ever did, and it always holds a special place in my heart! What is one (or more) of your favorite nail art designs? Let me know below! 

Be sure to check out Ever After on social media! 

Ever After's Facebook Fan Group: https://www.facebook.com/groups/790115414369756/

Thanks for stopping by, and I'll see you next time!
♥ Megan

Thursday, March 10, 2016

Lovely Layering: Zoya Willa and Vapid Lacquer TKO

*Purchased by me, and received through a swap*


Happy Thursday! I have some more layering for you today! This was kind of an "accidental" layering: One of the polishes is one that I own only in a mini, so I want to preserve it as much as possible!

For this mani, I began with two coats of Zoya Willa. Willa is a super creamy black creme. It is my absolute favorite black creme, and it is so smooth and shiny, even without topcoat! Zoya's cremes are always impeccable, and Willa is no exception.


After my two coats of Willa dried down, I topped it with one coat of Vapid Lacquer's TKO. I received TKO through a swap with a fellow polish-aholic, and I am so happy that I did!


TKO is a black base with ultrachrome chameleon flakies and multi-colored microglitter. It applied nice and smooth, and dried quickly! Here's what it looks like over Willa!


Isn't is beautiful?? Look at that multi-colored goodness!

Make sure to check out Zoya and Vapid at all of their social media sites!

Zoya website: http://zoya.com/
Zoya Facebook:https://www.facebook.com/ZoyaNailPolish/?fref=ts
Zoya Instagram: https://www.instagram.com/zoyanailpolish/

Vapid website: http://vapid.mybigcommerce.com/
Vapid Facebook: https://www.facebook.com/vapidlacquer/?fref=ts
Vapid Instagram: https://www.instagram.com/vapidlacquer/
Vapid Facebook Fan Group: https://www.facebook.com/groups/vapidlacquer/

Thanks for stopping by, and I'll see you next time!
♥ Megan